Hiring someone to build your website can feel like stepping into the unknown, especially if it's your first time. You know you need a professional site, but what actually happens after you sign? How long does it take? What will the designer need from you? Searching for a web design process for clients near you is a sign you want a partner who is clear and collaborative — not one who disappears and returns weeks later with something you didn't ask for.
This guide demystifies the entire journey. It walks through every stage of a professional web design process, explains what's expected of you as the client at each step, and shows you how to work with a local designer or agency to get a website you're proud of. When you understand the process, you become a better client — and better clients get better results.
Table of Contents
- Why a clear process matters
- Step 1: Discovery and strategy
- Step 2: Planning and information architecture
- Step 3: Design and prototyping
- Step 4: Development and content
- Step 5: Review, testing, and launch
- Step 6: Support and growth after launch
- Working well with a local web designer
- Frequently asked questions
- Final thoughts
Why a Clear Process Matters
A defined web design process protects both you and the designer. It sets expectations, prevents misunderstandings, and turns a potentially stressful project into a predictable, collaborative one. When you know what stage you're in and what comes next, you can plan your time, provide feedback at the right moments, and avoid the costly delays that come from confusion.
A transparent process is also one of the clearest signs of a professional. Agencies and freelancers who follow a structured approach — like the teams behind full-service website design — tend to deliver more reliable results than those who wing it. If a prospective designer can't clearly explain how they work, treat that as a warning sign.
The process below is typical of professional web projects. Individual designers may vary the details, but the core stages remain remarkably consistent across the industry.
Step 1: Discovery and Strategy
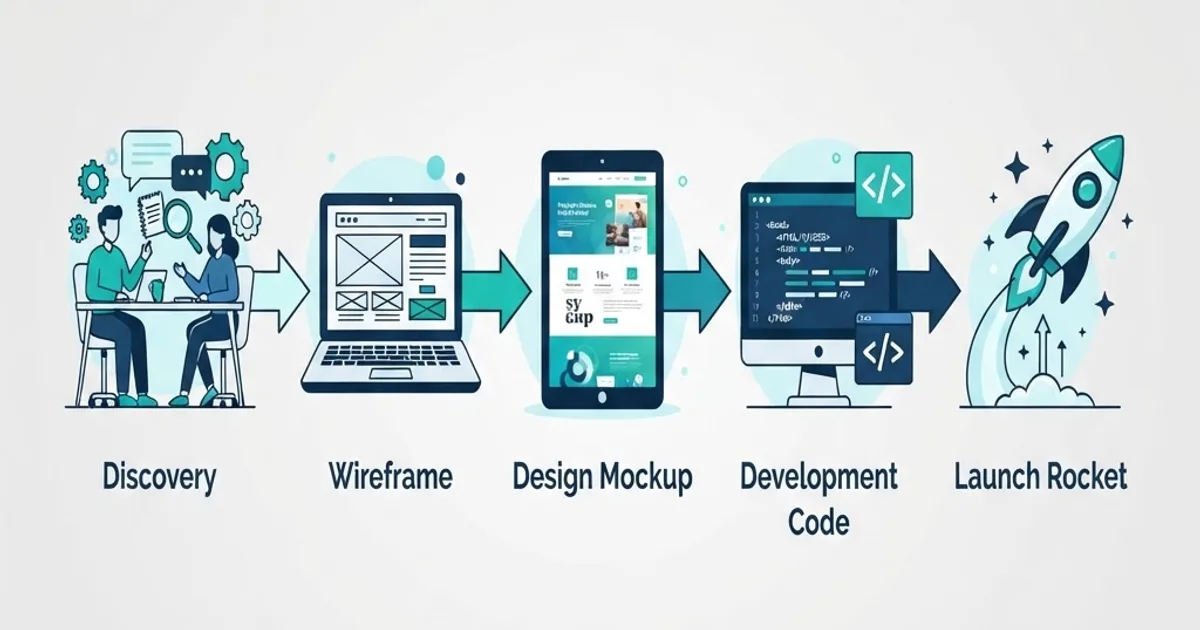
Every good project starts with understanding, not designing. In the discovery phase, your designer learns about your business, your goals, your audience, and your competitors. Expect questions like: What does your business do? Who are your ideal customers? What do you want visitors to do on the site? What websites do you admire, and why?
This is where you, the client, add the most value. The more context you provide — about your customers, your brand, your goals, and even your frustrations with your current site — the better the final result. Come prepared with examples of sites you like, a rough sense of your priorities, and clarity about what success looks like.
The outcome of discovery is a shared strategy: an agreed understanding of the site's purpose, its key pages, and the actions it should drive. This foundation guides every decision that follows and prevents expensive changes later.
Step 2: Planning and Information Architecture
With strategy in hand, the next step is planning the structure of the site. This is called information architecture — deciding what pages exist, how they're organized, and how visitors navigate between them. Your designer typically creates a sitemap showing the full page structure and may produce wireframes, which are simple black-and-white layouts that define where content and buttons go before any visual design begins.
Wireframes can feel underwhelming because they're intentionally plain, but they're one of the most important stages. They let you agree on structure and flow without getting distracted by colors or images. Reviewing wireframes carefully now saves significant time and cost later.
As a client, focus your feedback at this stage on structure and priorities: Is anything missing? Is the most important information easy to reach? Is the path to contacting you clear? Getting the skeleton right makes everything that follows smoother.
Step 3: Design and Prototyping
Now the site comes to life visually. Using the agreed structure, your designer applies your brand — colors, typography, imagery, and style — to create polished page designs, often as an interactive prototype you can click through. This is where you see how the finished site will actually look and feel.
Expect a round or two of revisions here. Good designers welcome specific, constructive feedback: 'the headline doesn't communicate what we do' is far more useful than 'I don't love it.' Supporting visual assets often come together at this stage too, such as infographic design to explain your process and social media posts and banner design to keep your brand consistent everywhere.
By the end of this phase, you should have approved designs for your key pages. Approving designs before development begins is important — changing visuals after coding starts is far more time-consuming and costly than changing them now.
Step 4: Development and Content
With designs approved, developers turn them into a real, working website. This is where the technical craft happens. Skilled front-end web development translates the designs into fast, responsive, pixel-accurate pages, while back-end web development powers the functionality behind the scenes — forms, databases, integrations, and content management.
Depending on your needs, your site might be built on a flexible platform like WordPress for easy editing, or on a modern framework such as React or Next.js for a fast, app-like experience. Your designer should explain which approach fits your goals and why.
Content is a shared responsibility at this stage. Your designer may need text, images, and brand assets from you, or may provide professional content writing as part of the project. Providing content promptly is one of the biggest things a client can do to keep the project on schedule — content delays are the most common cause of missed deadlines.
Step 5: Review, Testing, and Launch
Before the site goes live, it's thoroughly reviewed and tested. Your designer checks that everything works across devices and browsers, that pages load quickly, that forms submit correctly, and that the site meets accessibility standards. You'll typically get a chance to review a staging version and flag any final issues.
As a client, review this staging site carefully. Click every link, test every form, read the content on your phone, and confirm your contact details are correct. This is the moment to catch anything that slipped through — small fixes now are easy, while post-launch changes take more effort.
Once everything is approved, the site launches. A professional launch includes final checks, setting up analytics so you can measure performance, and confirming search engines can properly find and index your pages. Launch day should feel controlled and calm, not chaotic.
Step 6: Support and Growth After Launch
A professional relationship doesn't end at launch — that's where the website's real life begins. Websites need ongoing care: security updates, backups, performance monitoring, and content changes as your business evolves. This is where a plan like website maintenance and support becomes valuable, keeping your site secure, fast, and current.
Growth-minded clients also treat launch as the start of improvement. Paired with digital marketing and ongoing optimization, your new site can steadily attract more visitors and convert more of them over time. The best partners stay engaged, using real performance data to keep refining the site.
Discuss support expectations before the project begins. Knowing who handles updates, how quickly issues are resolved, and what ongoing support costs prevents surprises and ensures your investment keeps paying off long after launch.
Working Well with a Local Web Designer
Choosing a designer 'near me' has real advantages: face-to-face meetings, easier communication, and a partner who understands your local market. To get the most from the relationship, be responsive, provide feedback promptly, and be clear about your goals and constraints from the start.
Great client-designer relationships are collaborations, not handoffs. Trust your designer's expertise while sharing your knowledge of your business and customers. Ask questions when something is unclear, and give specific feedback rather than vague reactions. The projects that go best are the ones where both sides communicate openly and respect each other's expertise.
Whether your designer is down the street or across the country, the process and the principles are the same. What matters most is a clear process, good communication, and a shared commitment to building a website that genuinely serves your business.
Frequently Asked Questions
1. How long does the web design process take? A straightforward website often takes four to eight weeks, while larger or custom projects can take two to four months. Timelines depend heavily on project scope, revision rounds, and how quickly the client provides content and feedback.
2. What do I need to provide as a client? Expect to share information about your business and goals, brand assets like logos and colors, content (text and images) or approval of professionally written content, and timely feedback at each review stage.
3. How many revision rounds are typical? Most professional projects include one to three rounds of revisions at the design stage. Clear, specific feedback helps you make the most of each round and avoid unnecessary back-and-forth.
4. What's the difference between a sitemap and a wireframe? A sitemap shows which pages exist and how they're organized, while a wireframe is a simple layout showing where content and elements go on a page — both created before visual design begins.
5. Why do I need to approve designs before development? Because changing visuals after coding has started is far more time-consuming and costly. Approving designs first keeps the project efficient and on budget.
6. Should I choose a local designer or work remotely? Both can deliver excellent results. Local designers offer easier in-person collaboration and local market knowledge, while remote designers widen your options. A clear process and good communication matter more than location.
7. What happens after my website launches? Your site needs ongoing maintenance — updates, backups, security, and content changes — plus optional marketing and optimization to keep attracting and converting visitors. Arrange support expectations before the project ends.
8. What can I do to keep the project on schedule? Provide content and feedback promptly, be clear about your goals, and make decisions in a timely way. Content delays and slow approvals are the most common causes of missed deadlines.
Final Thoughts
The web design process doesn't have to be mysterious. When you understand the journey — from discovery and planning through design, development, launch, and ongoing support — you can engage confidently at every stage and help steer the project toward a result you love.
The best websites come from genuine collaboration between a client who knows their business and a designer who knows their craft. Bring clarity about your goals, provide content and feedback promptly, and choose a partner who follows a transparent, professional process.
If you're looking for a team that will guide you through every step with clear communication and real expertise, get in touch for a consultation. Let's map out a process — and a website — built around your goals.